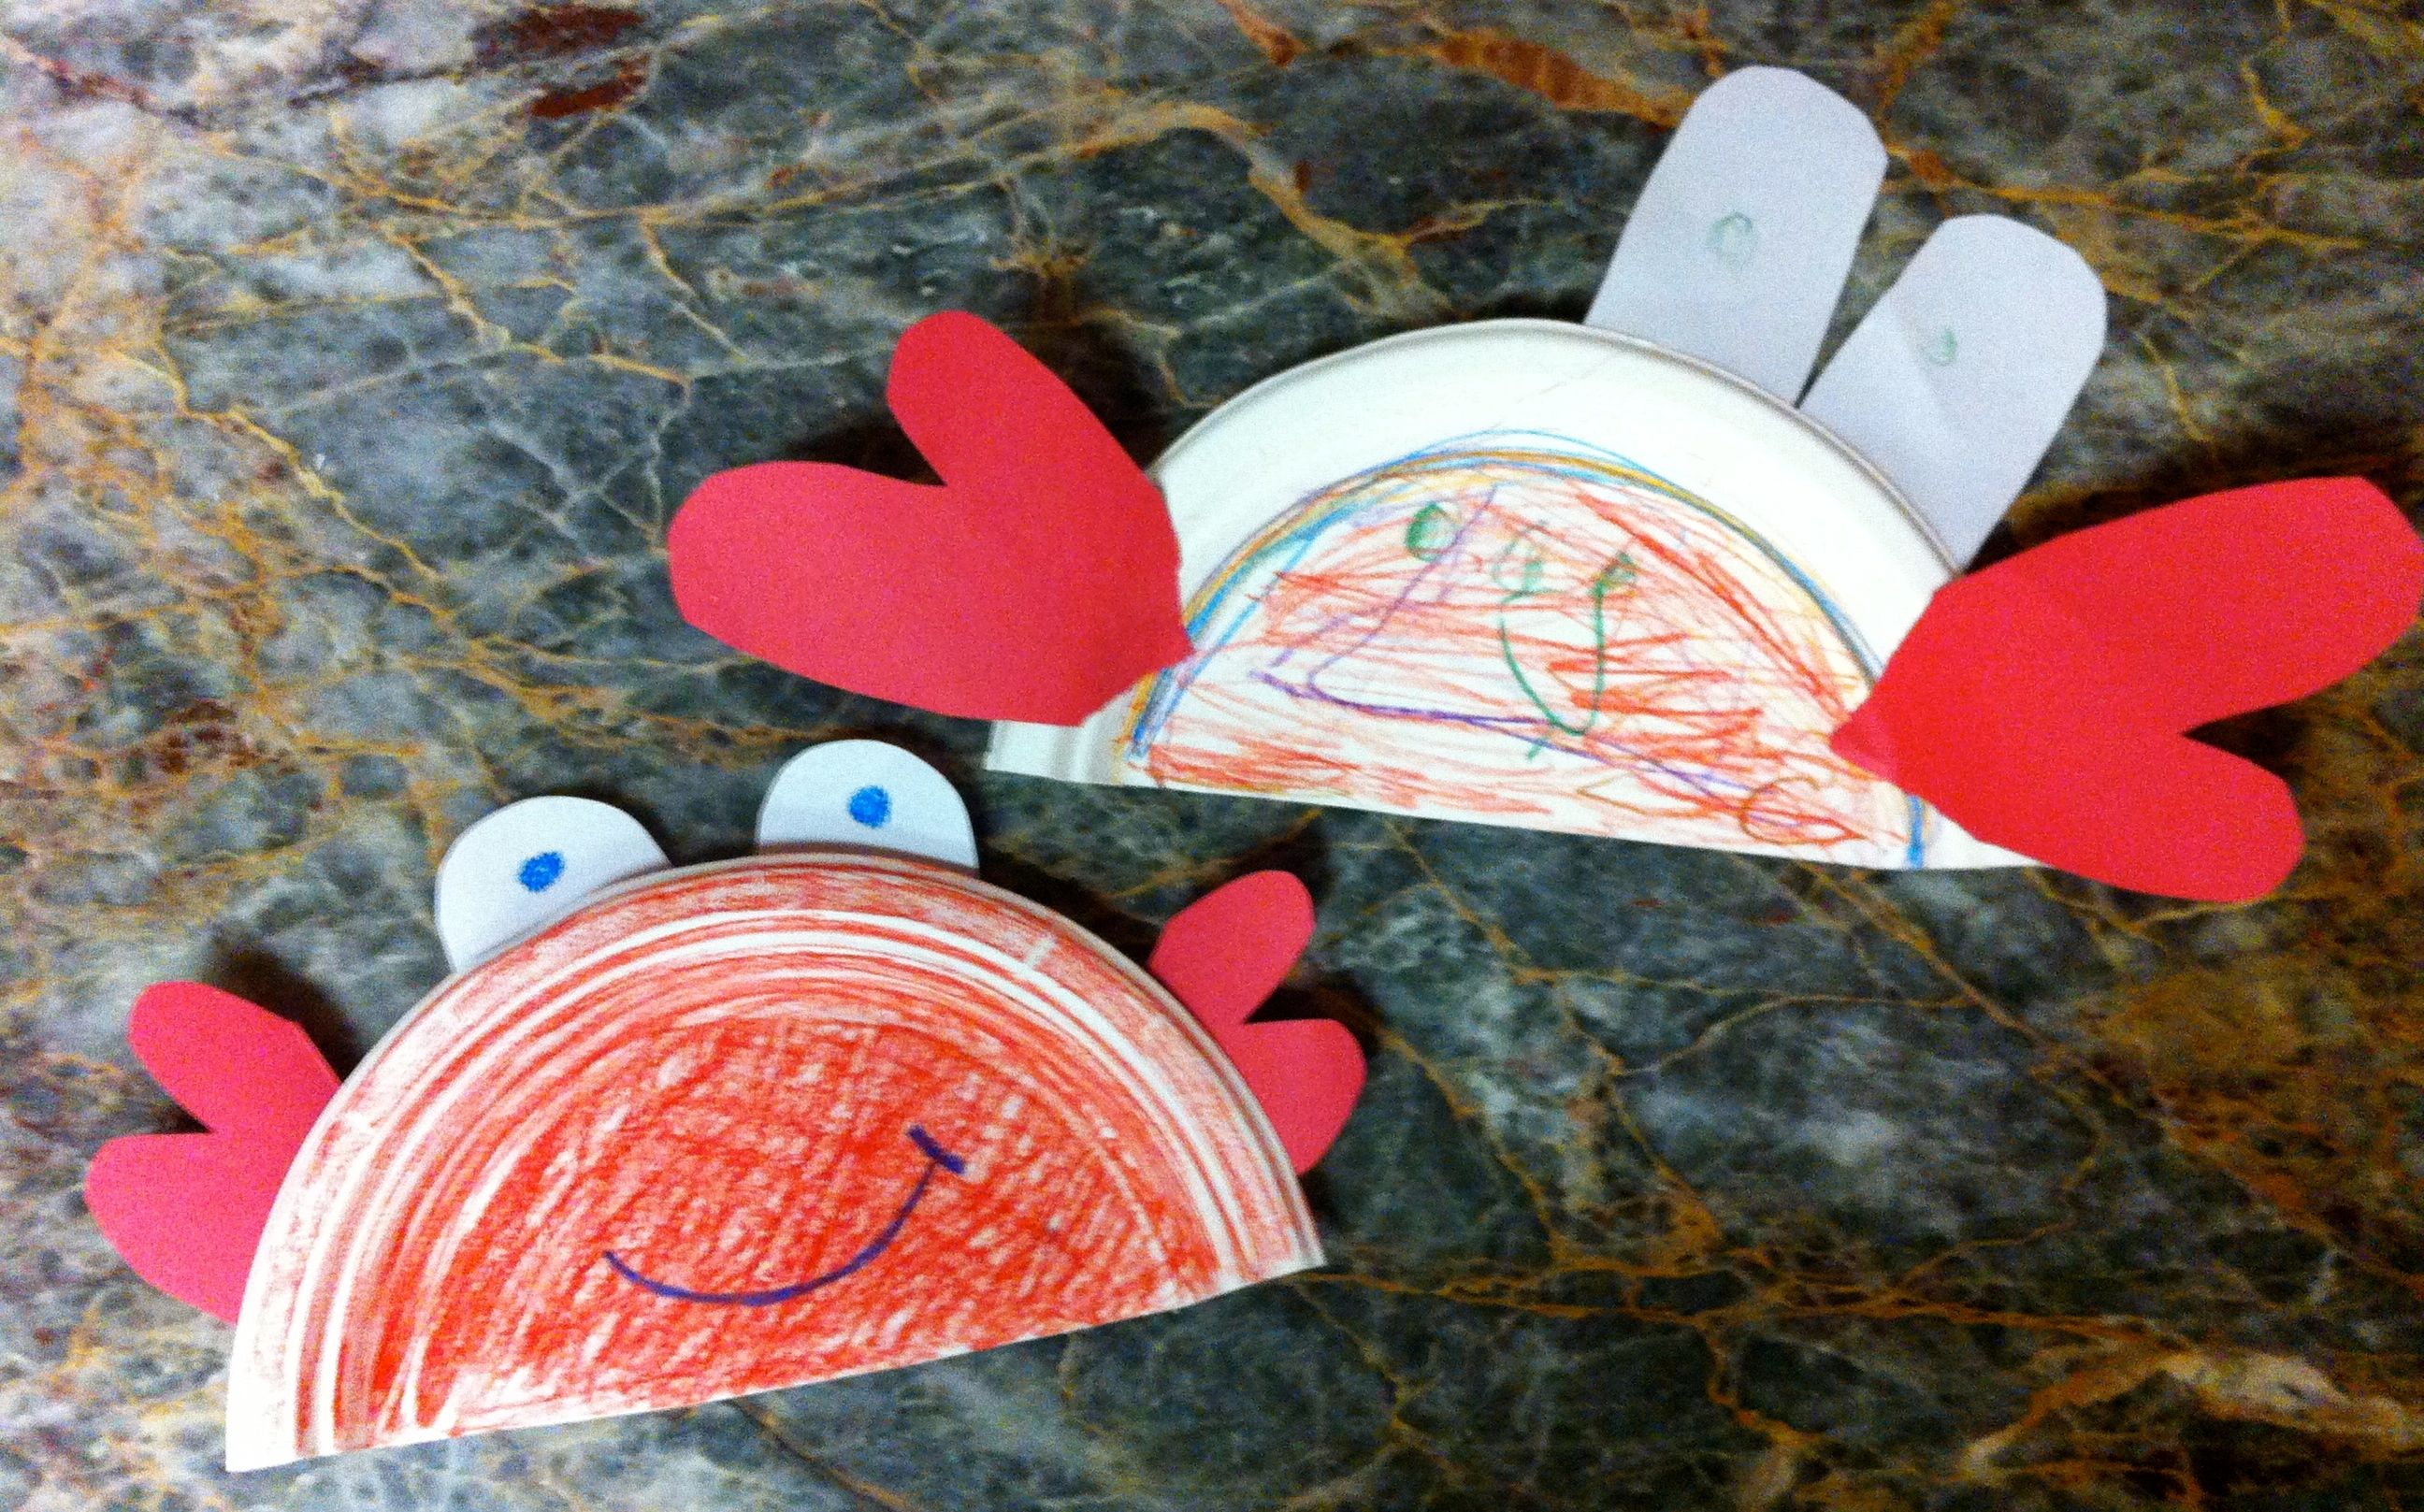
Crabby Cuties

Crabby CutiesWhen our favorite toddlers get cranky, it’s often boredom causing the meltdown. So next time your cutie gets crabby, have this simple craft handy. Meet our CRABBY CUTIES!

You’ll need: a half a paper plate, white & red construction paper, scissors, glue, and crayons.

CUT: Bigger kids will love to cut their own plates and paper, but encourage littles to try too. Our red claws are heart shaped, while our white eyes are oval shaped.

COLOR: Simply have your kiddo color the paper plate half as the crab’s hard shelled body.

GLUE: Then glue your crab claws and eyes to the back of the plate. We added blue pupils and a crooked smile to make our Crabby Cutie friendlier.

PLAY: While your crafted cutie dries, practice your own crab walks! Sit down and reach your hands back, now lift your belly button up to the sky. Try walking using your feet and hands as claws. And did you know most crabs walk sideways? Try crab walking side to side too!

Once little hands and bodies are kept busy, the crabbiness washes away and the cuteness comes out to play!

SPRAY BOTTLE SATURDAY

Spray Bottle SaturdaysNext time your little one needs some weekend fun, get out a spray bottle and your imagination! You’ll be surprised at how much there is to do, when SPRAY BOTTLE SATURDAY comes to the rescue.

1. Make safe spray paint! Mix a 1/4 cup of cornstarch with 1 cup warm water and about 5-10 drops of food coloring. Then spray a large piece of paper or old sheet into a marvelous mural!

2. Water the plants! Can you spray just the roots? How about only the littlest leaves or largest petals? Your budding gardener will love the challenge.

3. Give your dolls a beauty treatment. Spray her hair, then brush and style it into your best coif creation! Add a couple tablespoons of fabric softener to your spray for extra stylin’ hold.

4. Play spray bottle freeze tag! Burn off some energy with a super speedy round. If you get sprayed, strike a funny frozen pose until you are sprayed free once more!

5. Target practice on tissue paper! Place different color tissue squares on top of white paper. Then spray each, one by one. Watch in awe as the colors run!

6. Aim for the alphabet. Use chalk to draw the ABCs on the ground. Then call out each letter and let your little spray it until it magically disappears.

7. Make the old new again. Spray an older painting to see how water affects the colors and changes the whole piece. Add your latest abstract, modern art to your gallery.

8. Try spray bottle science! Fill your bottle with 3/4 cup vinegar, 1/4 cup water, and a bit of paint. Squirt a pan full of baking soda and examine your experiment’s funny fizzle!

PRESCHOOL PREPPED!

Preschool PreppedGetting ready for the start of preschool is one of the most exciting (and challenging!) times in a toddler’s life. Moms often ask us to share how to best prep their little one for this new chapter. So here are our top tips on how to get your kiddo PRESCHOOL PREPPED!

1. Visit beforehand. Plan a mini tour with your little, taking note of all the fun details the space has to offer. The red door, the caterpillar picture hanging on the wall, the green leggo table, etc etc.

2. Snap photos to bring home with you! Having the visual reminders of all these things will become a huge source of comfort for your soon-to-be preschooler! It’s especially helpful if you get a great snapshot of your soon-to-be teacher too.

3. Tell the school story! For example: “When we go back to school on Monday, we will push open the big red door, say Good Morning to the caterpillar picture, and then you can play on the green leggo table! What will you build?” Play this story out over and over again until your kiddo can tell it themselves.

4. Plan a post-preschool date. To assure kids you will be back, talk about what you will do after you pick them up. Will you listen to a special song in the car or get an after school snack together?

5. Listen. Sometimes a little one’s fears are kept inside because no one thought to ask them.  Although it’s tempting to quickly reassure your child and move on, instead let your child know that their worries have been heard.  Then you can address any fears before moving forward with this milestone together!

CONSTELLATION CREATION

Constellation CreationWe’ve been doing a lot of star gazing lately. Super moons and Summer skies have us in awe of nature’s evening masterpieces. So we decided to make our very own CONSTELLATION CREATIONS!

All you’ll need is: black construction paper, chalk, tin foil, and glue.

To start, tear little pieces of tin foil for your little to explore. Let them admire the shiny, smooth texture of this new craft material. Then encourage little hands to roll them into shining stars.

Next, plot and plan where on your night sky (black construction paper) to place your twinkling foils. Can your little add some to the top left and right of the page? Bigger kids will love to place them so they create a larger picture/shape. Glue each down.

Give the glue a few minutes to set. Count your stars from afar. A couple off key rounds of “Twinkle Twinkle Little Star” kept us waiting patiently.

Finally, use your chalk to connect the dots. Now your CONSTELLATION CREATION is complete!